Windows သံုးတဲ့ ကြန္ပ်ဴတာေတြမွာ Boot
Partition မဟုတ္တဲ့ Partition ေတြကို Explorer မွာ
မျမင္ရေအာင္
လြယ္လြယ္ကူကူပဲ ေဖ်ာက္ႏိုင္ ျပန္ေဖၚႏိုင္ပါတယ္.. ဘာ Software မွ
မလိုအပ္ပါဘူး.
. command prompt (CMD) ကိုပဲ သံုးၿပီး
ေဖ်ာက္ႏိုင္ေဖၚႏိုင္ပါတယ္..
Windows တင္ထားတဲ့ Partition ကိုေတာ့
လုပ္လို႔မရပါဘူး.. ပံုမွန္အားျဖင့္ဆို
C:\ ကိုေဖ်ာက္လို႔မရဘူးေပါ့...
ဘယ္လိုလုပ္သလဲၾကည့္ရေအာင္...
1. Windows Key နဲ႔ R ကိုတြဲႏွိပ္ၿပီး Run Box ေခၚလိုက္ပါ.. ၿပီးရင္ CMD လို႔ရိုက္ၿပီး Enter ေခါက္လိုက္ပါ...
2. CMD (Command Prompt) ထဲေရာက္လာရင္ diskpart လို႔ရိုက္ၿပီး Enter ေခါက္လိုက္ပါ...
1. Windows Key နဲ႔ R ကိုတြဲႏွိပ္ၿပီး Run Box ေခၚလိုက္ပါ.. ၿပီးရင္ CMD လို႔ရိုက္ၿပီး Enter ေခါက္လိုက္ပါ...
2. CMD (Command Prompt) ထဲေရာက္လာရင္ diskpart လို႔ရိုက္ၿပီး Enter ေခါက္လိုက္ပါ...
diskpart ဆိုတာ ကြန္ပ်ဴတာမွာ တပ္ဆင္ထားတဲ့ Hard Disk
ေတြရဲ႕ Partition
ေတြကို စီမံခန္႔ခြဲဖို႔အတြက္ အသံုးျပဳတဲ့ command ပါ..
Diskpart ဟာ
သီးျခားေဘာက္တစ္ခုအေနနဲ့ခြဲထြက္လာပါမယ္.. Windows 10
သံုးတဲ့သူဆို Diskpart
ကိုဖြင့္မွာလားလို႔ေမးပါတယ္.. Yes ကိုႏွိပ္လိုက္ရင္
diskpart ထဲကိုေရာက္ပါၿပီ...

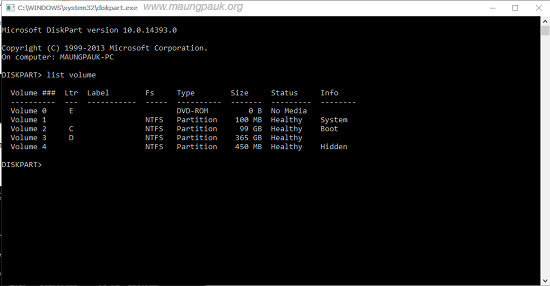
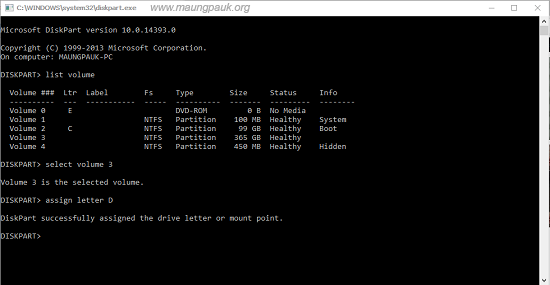
3. Diskpart ထဲမွာ list volume လို႔ရိုက္ၿပီး Enter ေခါက္ေပးပါ.. ဒါကေတာ့ Hard Disk မွာ
ကၽြန္ေတာ္တို႔ မျမင္ခဲ့ရတဲ့ Volume ေတြအပါအဝင္ Volume
ဘယ္ႏွစ္ခုပါသလဲဆိုတာကို
စာရင္းနဲ႔ျပခိုင္းတာပါ.. ကၽြန္ေတာ့္ကြန္ပ်ဴတာမွာ
ကၽြန္ေတာ္က Partition 2 ခုသာ
ပိုင္းထားေပမယ့္ ကြန္ပ်ဴတာက Volume 4 ခု
ပိုင္းထားပါတယ္. Volume 0 ကေတာ့ DvD Drive ပါ...
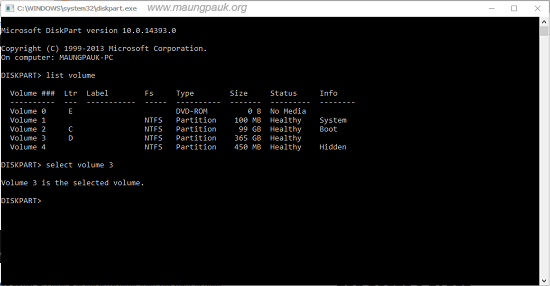
4. ၿပီးရင္ ကိုယ္ေဖ်ာက္ခ်င္တဲ့ Volume ကိုေရြးေပးရပါတယ္.. ဘယ္လိုေရြးေပးရမလဲဆိုေတာ့
select volume .No ျဖစ္ပါတယ္... ကၽြန္ေတာ္က
Volume 3 ( Partition D)
ကိုေဖ်ာက္ခ်င္တဲ့အတြက္ select volume 3
လို႔ရိုက္ၿပီး Enter ေခါက္လိုက္ပါတယ္..
Volume 3 is the selected volume
ဆိုၿပီး Volume 3 ကိုေရြးၿပီးေၾကာင္းျပပါတယ္..
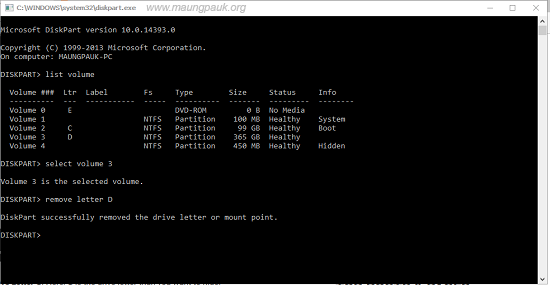
5. ကိုယ္က Drive D ကိုေဖ်ာက္ခ်င္တာျဖစ္တဲ့အတြက္ remove letter D လို႔ရိုက္လိုက္ပါတယ္...
DiskPart successfully removed the drive letter or
mount point ဆိုၿပီး ကိုယ္ေဖ်ာက္ခ်င္တဲ့
Drive ကိုေဖ်ာက္ၿပီးေၾကာင္း
ေျပာပါတယ္...
ဒီေနရာမွာ သတိထားရမွာက Volume နဲ႔ Letter ျဖစ္ပါတယ္.. Volume ဆိုတာက Hard Disk ကို
ပိုင္းထားထဲ့ အပိုင္းအေရအတြက္အားလံုးကိုေျပာတာျဖစ္ပါတယ္..
ကၽြန္ေတာ္က Hard Disk
ကို Partition ၂ ပိုင္းသာ ပိုင္းထားခဲ့ေပမယ့္ Windows
OS က သူလိုအပ္တဲ့အတိုင္း Volume 1 နဲ႔
Volume 4 ကို
သူ႔အလိုလိုပိုင္းထားပါတယ္.. ဒါေပမယ့္ ကၽြန္ေတာ္ တကယ္ျမင္ရတာက Partition C
နဲ႔
Partition D သာျမင္ရပါတယ္... Letter ဆိုတာကေတာ့ Partition ကို
ေပးထားတဲ့ ကိုယ္စားျပဳ
အကၡရာျဖစ္ပါတယ္.. Volume တိုင္းမွာ
အကၡရာနဲ႔ကိုယ္စားျပဳေဖၚျပထားတာမဟုတ္ပါဘူး..
Volume 2 က Letter C, Volume 3 က
Letter D ျဖစ္ၿပီး Volume 0 ကေတာ့ Letter E ျဖစ္ပါတယ္..
ခုလို Partition
ေဖ်ာက္တယ္ဆိုတာ တကယ္ေတာ့ Drive Letter ကိုသာ ေဖ်ာက္လိုက္ျခင္းျဖစ္ပါတယ္..
Volume တစ္ခုကိုကိုယ္စားျပဳထားတဲ့ Letter ကိုသာ ေဖ်ာက္လို႔ရပါတယ္..
သို႔ေသာ္ Windows တင္ထားတဲ့ Letter C ကိုေတာ့ မေဖ်ာက္ႏိုင္ပါဘူး...
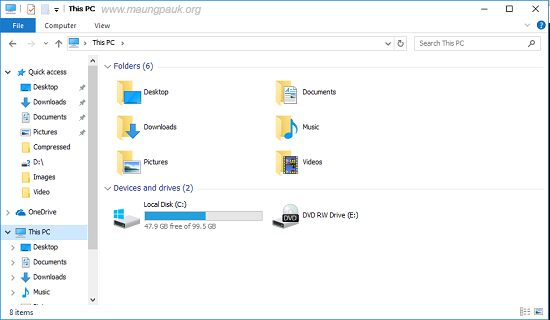
ဟုတ္ၿပီ.. ေဖ်ာက္ေတာ့ ေဖ်ာက္ထားၿပီ... ဘယ္လိုျပန္ေဖၚမလဲ၊ ဒါမွမဟုတ္ ေဖ်ာက္ထားတဲ့
Volume ကို ဘယ္လိုျမင္ရမလဲ...အထက္မွာေဖၚျပခဲ့တဲ့ အဆင့္ ၁ ကေန အဆင့္ ၄
( ကိုယ္ျပန္ေဖၚခ်င္တဲ့ Volume ကို
Select လုပ္ၿပီးတဲ့အဆင့္) ထိေအာင္ လုပ္ပါ...
အဆင့္ ၃ မွာ list volume
ျပကတည္းက Gb ပမာဏမ်ားမ်ားနဲ႔ Volume တစ္ခုဟာ
Drive Letter ေပ်ာက္ေနေၾကာင္း
သတိထားမိမွာျဖစ္ပါတယ္...
အဆင့္ (၄)ၿပီးသြားလို႔ ကိုယ္ျပန္ေဖၚခ်င္တဲ့ Volume
ကို Select ကိုလုပ္ၿပီးသြားရင္
ရိုက္ရမယ့္စာသားက assign letter .No
ျဖစ္ပါတယ္.. ကၽြန္ေတာ္က Drive Letter D
ကိုျပန္ေဖၚမွာျဖစ္တဲ့အတြက္ assign
letter D လို႔ရိုက္လိုက္ၿပီး Enter ေခါက္ပါတယ္...
DiskPart successfully
assigned the drive letter or mount point
ဆိုၿပီး ေဖ်ာက္ထားတဲ့ Drive
ကိုျပန္ေဖၚျပီးျဖစ္ေၾကာင္း ျပပါတယ္...
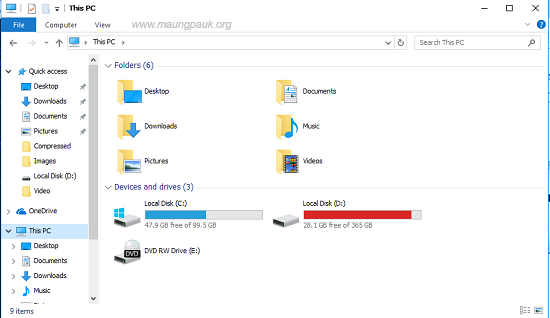
ခုနက ေဖ်ာက္ထားတဲ့ Drive D ျပန္ေပၚလာပါၿပီ...
#kolinn
No comments:
Post a Comment